Blendspace has become my go-to tool for organizing resources. You are going to LOVE it! It is a FREE web tool that allows you to collect resources in one place. You can also search the Gallery for Blendspace that other teachers have already created. Why reinvent the wheel? I love the gallery feature. I have found so many great resources this way to add to my curriculum.
You can pull resources from virtually anywhere. From within the app! You can pull from YouTube, websites, pictures, Flickr, Dropbox, powerpoints, Google images and Google Drive. It makes pulling together resources very quick and easy. You search, drag and drop right into the Blendspace tiles. It really is that easy!
Within Blendspace, you can create multiple choice quizzes. This allows you to assess the students' learning right alongside the content. Since you can add from Google Drive, you can add Google Forms for more in depth questions! The resources are numbered, so another way to use Blendspace is to add text (directions) to the first tile and create an assignment or WebQuest, and put your assessment or Google Form at the end.
You can create a unique URL code for your Blendspace. This can be shared with colleagues or with your students. I've been using this feature this past quarter. I shared resources on the Pythagorean Theorem with parents and students to supplement the curriculum. I've also used this to share with other teachers in our building that teach the same content.
Blendspace has a feature that allows you to create a class and add your students. This gives them password access to your Blendspace. It adds a whole new dimension to this already incredible tool! When you add students, you will be able to see who has accessed your lessons and you can gather data from the embedded assessments. Students can comment on resources - even videos. This can be invaluable feedback! Students can ask for help or tag areas that they need additional support. Students can even create their own Blendspace, as way to demonstrate their learning. Authentic assessment in its truest form!
Blendspace is a great tool for every teacher, regardless of your grade level or content area. You can use it as a way to organize resources, or to share with your colleagues. I like naming my Blendspaces by skill. This will make planning next year really easy! I also like how it's visual, with its large tile format. This is what gives it an edge over Google Drive or Dropbox, in my opinion. It's a perfect addition to your BYOD classroom or flipped classroom. It is accessible with any device that has internet access since it is web based. It is also an excellent way to differentiate lessons and for assessment.
Ready to get started? Watch this YouTube Video on Blendspace and enjoy!
Do you love playing Kahoot with your classes? Well you're going to LOVE Quizziz! It's similar to Kahoot, but you are given a choice between playing it live or assigning it for homework! Each response is followed by a funny meme. They love it! A major difference that I appreciate is that it's student paced. You don't have to wait for the entire class to respond to a question to move on. As a student answers a question, they move on to the next one right away. This is great for students who may not work well under the pressure of a timer.
Just like Kahoot, you can search for pre-made quizzes by category, OR you can create your own. They're very easy to create from scratch. What I really appreciate is that I can duplicate a pre-made quiz, and then edit to make it exactly what I need.
When you log in to the site, you are taken to a main page. It contains 4 tabs across the top: Public, My Quizizz, Create and My Reports.
Public contains all the public Quizizzes that you can search through to duplicate and use. You can search by category or by "All". You will also see the option here to Create your own quiz.
My Quizizz page contains all the Quizizzes that you create or duplicate. When you select the one you want to use, you are given several options. You can immediately play Live or assign for Homework. You also have the option to duplicate, edit or delete. Below this you have Question settings. You can choose to jumble the questions and/or answers. You can choose to show answers after each question and you can show all questions at the end of the quiz. There are game settings as well. You can choose to include a Leaderboard, Question timer which awards more points the faster you answer, include memes after responses and play music during the game.
Create is where you can create your own Quizizzes from scratch. You can add a picture to your Quizizz title, add an image to your questions, change the ink color, use subscript and postscript, change the language and opt out of memes if you'd like. Another feature that sets it apart from Kahoot is that it gives you the option of using math and other symbols. This is AWESOME!!! The questions must be multiple choice, with at least 2 options, and you indicate which is the correct answer. When you're done, you have to select the grade, subject and topic. Another unique feature is that you can add tags to your Quizizz, and opt to make it public or private. At the top of the page is a Tutorial you can view if you need it, although it's fairly self explanatory.
Finally, My Reports is the page that gives you student scores.
You can view scores based on question responses, or by student. The students are listed in order by their scores.
Either way, you are given the overall % accuracy, # of questions and # of players. I also like that you can expand
the individual players to see exactly which ones they got right/wrong.
Overall, this is an excellent way to assign homework and make it fun for our students. What I've come to love is that my students will take the quiz over and over again to try to improve their score. Instead of doing 10 problems at night, they're seeing them 20-30-40 times! This also makes an easy way to grade homework - I don't have to bring home stacks of paper, and they don't have to worry about losing it. It truly is a win-win for teachers and students.
If you want to see what a homework session looks like, you can log in to join.quizizz.com and use the code 03849. This will be open until March 8. The topic is integers. :)
Get started by creating your own FREE account at www.quizizz.com/signup. Enjoy!
I really enjoyed presenting tonight at APP night. I shared 3 of my favorite apps that I use with my math classes. I hope you will try them!
Ten Marks.
This web based app gives support to math classrooms. You can use it to differentiate your instruction by assigning work for your students on their level! Very powerful to use as pre and post assessments, and to gauge where your students are with a particular skill.
www.tenmarks.com
Prodigy Game.
This is role-playing game that uses math problems in "battle". The teacher assigns the common core skill and the students play the game. Teachers can retrieve data on student performance. This can be used to guide instruction and identify gaps and needs.
www.prodigygame.com and click "Log In" to create your account.
Teacher Desmos
The are teacher-created activities that are searchable by skill. You can view the students' work in REAL time! They are incredibly engaging and there are so many that you can find what you need for your students, when you need it. Geared towards middle school and above. (You can also create your own activities!) You can practice using the student log in below and the code HP6J. Have fun!
Teachers create an account at teacher.desmos.com
Students log in at student.desmos.com
Thanks for coming!
Blendspace is a FREE online tool that pulls together resources that can be shared with students in the form of digital lessons. This supports flipped classrooms, differentiation and additional practice. It is hosted by TES, which is a resource for educator-designed lesson plans, activities and units.
Once you create your free account, you create your class. It will give you a link to share with students so they can sign up. You can track the students that have signed up and how far they've progressed.
Creating lessons literally takes about 5 minutes. After you click on "+ New Lesson", you add a title and start researching resources with the search tool. You can search through YouTube videos, Google images and webpages, Flickr, Gooru, Dropbox, Google Drive, or upload your own documents or photos. To add these to your "canvas", you just drag and drop. You can also add text directly into the "tile", or add a quiz. Once you've added what you want, you can change the titles for each "tile" and rearrange them by dragging and dropping them. Finally, you can add common core standards tags with a drop down menu.
The Gallery feature lets you search other people's lessons through the search tool. When you find one that meets your needs, you "copy" it and it will populate under your Lessons as a "copy". Now it's available to your class!
Now that you're done creating your lesson, you can share it. There's a share button that lets you share directly through Twitter, email, Facebook, an embed code for blogs, or a QR code. You can collaborate directly with your co-workers. You can invite them by email or provide them with a link. There's also an option to set the lesson to private so no one else can access it.
Students can progress through the "tiles" with the arrow buttons. They can comment on these and rate them as well. It is advisable to start the lesson by using the first tile to provide lesson objectives and expectations for the assignment you want completed.
Although Blendspace is extremely user-friendly and easy to naviate, they have a resource page. They give you more ideas of how to incorporate Blendspace into your classroom and tips on how to use it.
The possibilities are truly endless! You can use Blendspace strictly as a place to store your resources by each standard or topic. You can use Blendspace to flip you classroom, by providing students a one-stop-shop to find the videos and resources you want them to access before coming to school. You can have students access different lessons as a way to differentiate your instruction. You can use it to extend learning for students who need more of a challenge, or you can use it as a way to remediate students who have gaps. Blendspace is incredibly versatile and fits perfectly with every teacher and every classroom!
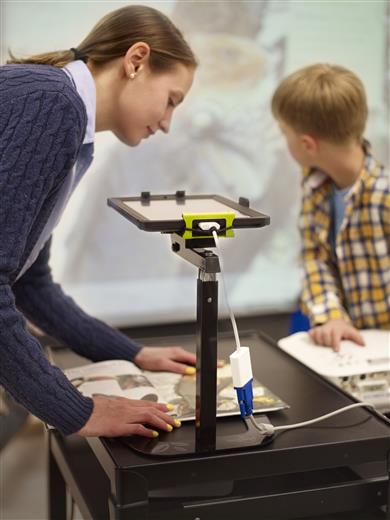
I've had many teachers ask me how I use my iPad with my Smartboard in my classroom. It's pretty easy and inexpensive. I use my LCD cart as a projector for my iPad. I can't manipulate the iPad through the Smartboard, it just projects. But you can see everything I have on my iPad. My favorite way is to use the camera - it creates an instant document camera!
First, in order to connect you'll need a cord - the type depends on your projector. You'll either need a VGA or HDMI adaptor. Splurge for the Apple brand. Since their latest update, my generic cord won't work. I had to get the Apple brand, and now it works just fine. If you're not sure which cord you need, ask your IT person. They will be able to help you hook it up, too. My guy hooked mine up so I can go back and forth between my computer and my iPad with the touch of a button. (Thanks, Justin!)
The stands are pretty expensive, and I have yet to find one that will work with an Otterbox case. What I use instead is a locker stand. Yes, a locker stand. I found mine at Walmart for $3 on sale!
I simply place my iPad on top of the stand so the camera is not blocked by the grid. Voila - a document camera! The picture is sharp, and I can zoom in pretty tight. I've used other document cameras that didn't zoom or didn't have a quality picture. They were so frustrating! Now, I can easily show measurements, work with maniuplatives or work out problems for students on paper that they can see on the Smartboard, and I don't have to turn my back on them! It makes teaching a much more personal experience!
The only drawback to the locker stand is that the legs get in the way when I'm zooming in and I need to move the paper around. For now, I am learning to work around that. But one day, I hope to find someone to make me this, and also allow for the thickness of the Otterbox case and let it swivel.
 In addition to using the camera on the iPad as a document camera, I use an app called CamDraw ($.99). It lets you sketch
right over the live view from the camera. I can work on handouts
without having to take a picture of it first, and without having to
waste a copy. This is particularly useful when we work on graphing equations - saves me a ton of graph paper!
If you already have an iPad and a projector, it's a great investment to buy the cord so you can project your iPad screen. Using my iPad as a document camera has changed the way I teach, and I feel it has made me a more effective teacher.
In addition to using the camera on the iPad as a document camera, I use an app called CamDraw ($.99). It lets you sketch
right over the live view from the camera. I can work on handouts
without having to take a picture of it first, and without having to
waste a copy. This is particularly useful when we work on graphing equations - saves me a ton of graph paper!
If you already have an iPad and a projector, it's a great investment to buy the cord so you can project your iPad screen. Using my iPad as a document camera has changed the way I teach, and I feel it has made me a more effective teacher.
Popplet is an app that is web based, and also available on iOS. It is incredibly versatile and can be used in so many different ways, in ANY classroom. It's an online mind map! It's very easy and intuitive to use. It allows you to think and learn visually. It allows you to capture facts, thoughts, images and videos - to help you create relationships between them. What a great tool to help visual learners!
The free version of popplet (lite) has a 5 project limit. Otherwise, it's the same as their paid version ($4.99). You can collaborate and share with others, too! My Girl Scouts suggested using this as we plan our meetings and badges. I know event planners that use this as well! Did I mention it's incredibly versatile??!!
When you go to www.popplet.com, create your free account. To begin your first popplet, just double click on the blank "canvas". This is how you create your first "popple". Using the tabs at the bottom of the popple, you can change its color, add text, draw or add an image. Images can be added from Flickr or uploaded from your computer. You can also add video from YouTube or Vimeo. A great feature is that you can search for videos within the app.
Popplet lets you collaborate through their "Share" button. You can also share through a link, or on social media. This makes group work outside of school much easier on students who may not be able to get together physically.
The possibilities are endless! Some ideas I've come across for various content areas include:
Language Arts - Story Maps, Writer's Workshop...
Math - Representing Numbers (decomposition, prime factorization) Exponent Laws...
Science - Phases of Mitosis, Phases of the Moon, Classification
Social Studies - Time Lines
ALL CONTENT AREAS - Word Walls / Vocabulary
Students will quickly navigate this app. Let them explore next time you're using computers or iPads. I bet they'll surprise you with their creations!
Socrative is an app that engages and assesses students in real time. It can manage up to 50 students at a time. It supports subscripts and superscripts for math content. It is also incredibly versatile and fits in with any teaching style! My favorite feature is that it supports Short Answer responses. I think this is a huge asset to Language Arts teachers who often tell me the other apps don't work for them because multiple choice just doesn't lend itself well to their content. I think this solves the problem for many content areas, not just language arts. They've just complained the most! (JS!!!)
Socrative is FREE, and it is web based, so you can access it on any device, laptop or computer. (You can also download the teacher app or the student app on Android and iOS plaforms.) It also lets you create and share quizzes OR you can do this on the "fly" with no preparation whatsoever.
Create your account by going to www.socrative.com and signing up. This is the same site students will go to sign in, but will click on Student Login. They don't need email, it just gives them the screen to put in your "Room #". Your Room # will be created when you make your account.
Start out in the tab that says "Manage Quizzes". Here
you have 4 choices: Create a Quiz, Import Quiz, My Quizzes, and
Reports. Click on Create Quiz and start entering your questions
(Multiple Choice, True/False or Short Answer). You will also find your
"Share Quiz Code" that you can share with others! If you click on
"Import Quiz", you can either import a quiz from an Excel sheet, or use
someone else's code to use their quiz. My Quizzes lists the quizzes
you've already made. You can duplicate, delete, download or edit them
from here. Finally, Reports is where you go to get your class results.
You can get the whole class' results in an Excel sheet or individual
reports in .pdf or even individual question results in .pdf. There's a
choice of having the results emailed, downloaded or saved to your Google
Drive.
The other tab is the Dashboard. From here you have 4 choices: Start a Quiz, Quick Question, Space Race or Exit Ticket. Start a quiz and Space Race use quizzes you've previously created or added. Quick Question can be done on the fly. You can choose from Multiple Choice, True/False or Short Answer. The Exit Ticket consists of 3 pre-set questions that assess understanding, asks what was learned, and a Teacher Question that you can give verbally or on your board - that's also short answer. The perfect Exit Ticket!
When you choose "Start A Quiz", you first select the quiz you want to use from the ones you've created. You also choose how to deliver the quiz. You can let it be student paced, where they get immediate feedback (in order, no skipping, no changing answers), or student paced where they control the navigation (any order, they can skip questions). You can also deliver it as Teacher paced, where you can send one question at a time, in any order, you can skip questions and also revisit questions.
The Space Race uses the quiz of your choice and object of your choice. Some choices include a rocket, unicorn or a bear. As students answer the questions correctly, their object "races" across the screen. They LOVE this game!!! And I love that I can download the report and see how well they've mastered the content!
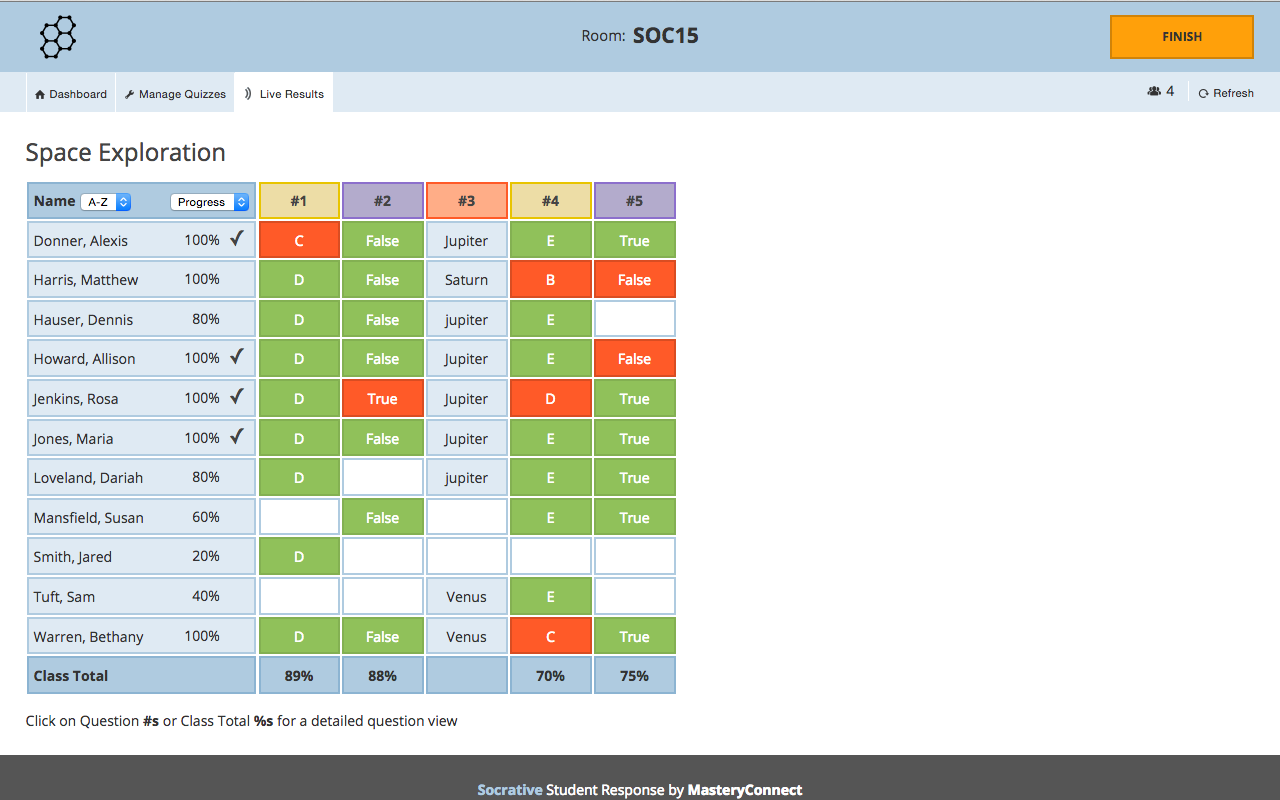
The third tab is for "Live Results". From here you can watch the students' progress in real time.
This app is very user friendly and incredibly easy to navigate. The students really enjoy the Space Race - it gets them engaged and focused on the content. The "Start A Quiz" feature is wonderful for independent work if you have computers in your room, or want to assign an online quiz for homework.