Tuesday, December 15, 2015

Blendspace


Blendspace is a FREE online tool that pulls together resources that can be shared with students in the form of digital lessons.  This supports flipped classrooms, differentiation and additional practice.  It is hosted by TES, which is a resource for educator-designed lesson plans, activities and units.  

Once you create your free account, you create your class.  It will give you a link to share with students so they can sign up.  You can track the students that have signed up and how far they've progressed.


Creating lessons literally takes about 5 minutes.   After you click on "+ New Lesson", you add a title and start researching resources with the search tool.  You can search through YouTube videos, Google images and webpages, Flickr, Gooru, Dropbox, Google Drive, or upload your own documents or photos.  To add these to your "canvas", you just drag and drop.  You can also add text directly into the "tile", or add a quiz.  Once you've added what you want, you can change the titles for each "tile" and rearrange them by dragging and dropping them.  Finally, you can add common core standards tags with a drop down menu.  

The Gallery feature lets you search other people's lessons through the search tool.  When you find one that meets your needs, you "copy" it and it will populate under your Lessons as a "copy".  Now it's available to your class!

Now that you're done creating your lesson, you can share it.  There's a share button that lets you share directly through Twitter, email, Facebook, an embed code for blogs, or a QR code.   You can collaborate directly with your co-workers.  You can invite them by email or provide them with a link.  There's also an option to set the lesson to private so no one else can access it.

Students can progress through the "tiles" with the arrow buttons.  They can comment on these and rate them as well.  It is advisable to start the lesson by using the first tile to provide lesson objectives and expectations for the assignment you want completed.  

Although Blendspace is extremely user-friendly and easy to naviate, they have a resource page.   They give you more ideas of how to incorporate Blendspace into your classroom and tips on how to use it.

The possibilities are truly endless!  You can use Blendspace strictly as a place to store your resources by each standard or topic.  You can use Blendspace to flip you classroom, by providing students a one-stop-shop to find the videos and resources you want them to access before coming to school.  You can have students access different lessons as a way to differentiate your instruction.  You can use it to extend learning for students who need more of a challenge, or you can use it as a way to remediate students who have gaps.  Blendspace is incredibly versatile and fits perfectly with every teacher and every classroom!


Monday, December 7, 2015

iPad as a Document Camera


I've had many teachers ask me how I use my iPad with my Smartboard in my classroom.  It's pretty easy and inexpensive.  I use my LCD cart as a projector for my iPad.  I can't manipulate the iPad through the Smartboard, it just projects.  But you can see everything I have on my iPad.  My favorite way is to use the camera - it creates an instant document camera!


ipadConnections2

First, in order to connect you'll need a cord - the type depends on your projector.  You'll either need a VGA or HDMI adaptor.  Splurge for the Apple brand.  Since their latest update, my generic cord won't work.  I had to get the Apple brand, and now it works just fine. If you're not sure which cord you need, ask your IT person.  They will be able to help you hook it up, too.  My guy hooked  mine up so I can go back and forth between my computer and my iPad with the touch of a button.  (Thanks, Justin!)  

The stands are pretty expensive, and I have yet to find one that will work with an Otterbox case.  What I use instead is a locker stand.  Yes, a locker stand.  I found mine at Walmart for $3 on sale!
 

I simply place my iPad on top of the stand so the camera is not blocked by the grid.  Voila - a document camera!  The picture is sharp, and I can zoom in pretty tight.  I've used other document cameras that didn't zoom or didn't have a quality picture.  They were so frustrating!  Now, I can easily show measurements, work with maniuplatives or work out problems for students on paper that they can see on the Smartboard, and I don't have to turn my back on them!  It makes teaching a much more personal experience!

The only drawback to the locker stand is that the legs get in the way when I'm zooming in and I need to move the paper around.  For now, I am learning to work around that.  But one day, I hope to find someone to make me this, and also allow for the thickness of the Otterbox case and let it swivel.  

In addition to using the camera on the iPad as a document camera, I use an app called CamDraw ($.99).  It lets you sketch right over the live view from the camera.  I can work on handouts without having to take a picture of it first, and without having to waste a copy.  This is particularly useful when we work on graphing equations - saves me a ton of graph paper!


If you already have an iPad and a projector, it's a great investment to buy the cord so you can project your iPad screen.  Using my iPad as a document camera has changed the way I teach, and I feel it has made me a more effective teacher. 


Tuesday, November 17, 2015

Popplet

Popplet is an app that is web based, and also available on iOS.  It is incredibly versatile and can be used in so many different ways, in ANY classroom.  It's an online mind map!  It's very easy and intuitive to use.  It allows you to think and learn visually.  It allows you to capture facts, thoughts, images and videos - to help you create relationships between them.  What a great tool to help visual learners!

The free version of popplet (lite) has a 5 project limit.  Otherwise, it's the same as their paid version ($4.99).  You can collaborate and share with others, too!  My Girl Scouts suggested using this as we plan our meetings and badges.  I know event planners that use this as well!  Did I mention it's incredibly versatile??!!


When you go to www.popplet.com, create your free account.  To begin your first popplet, just double click on the blank "canvas".  This is how you create your first "popple".  Using the tabs at the bottom of the popple, you can change its color, add text, draw or add an image.  Images can be added from Flickr or uploaded from your computer.  You can also add video from YouTube or Vimeo.  A great feature is that you can search for videos within the app.
Popplet lets you collaborate through their "Share" button. You can also share through a link, or on social media.  This makes group work outside of school much easier on students who may not be able to get together physically.

The possibilities are endless!  Some ideas I've come across for various content areas include:
Language Arts - Story Maps, Writer's Workshop...
Math - Representing Numbers (decomposition, prime factorization) Exponent Laws...

Science - Phases of Mitosis, Phases of the Moon, Classification
Social Studies - Time Lines

ALL CONTENT AREAS - Word Walls / Vocabulary


Students will quickly navigate this app.  Let them explore next time you're using computers or iPads.  I bet they'll surprise you with their creations!

Tuesday, November 3, 2015

Socrative


Socrative is an app that engages and assesses students in real time.  It can manage up to 50 students at a time.  It supports subscripts and superscripts for math content.  It is also incredibly versatile and fits in with any teaching style!  My favorite feature is that it supports Short Answer responses.  I think this is a huge asset to Language Arts teachers who often tell me the other apps don't work for them because multiple choice just doesn't lend itself well to their content.  I think this solves the problem for many content areas, not just language arts.  They've just complained the most!  (JS!!!)

Socrative is FREE, and it is web based, so you can access it on any device, laptop or computer.  (You can also download the teacher app or the student app on Android and iOS plaforms.) It also lets you create and share quizzes OR you can do this on the "fly" with  no preparation whatsoever. 


Create your account by going to www.socrative.com and signing up.  This is the same site students will go to sign in, but will click on Student Login.  They don't need email, it just gives them the screen to put in your "Room #".  Your Room # will be created when you make your account.  

Start out in the tab that says "Manage Quizzes".  Here you have 4 choices:  Create a Quiz, Import Quiz, My Quizzes, and Reports.  Click on Create Quiz and start entering your questions (Multiple Choice, True/False or Short Answer).  You will also find your "Share Quiz Code" that you can share with others!  If you click on "Import Quiz", you can either import a quiz from an Excel sheet, or use someone else's code to use their quiz.  My Quizzes lists the quizzes you've already made.  You can duplicate, delete, download or edit them from here.  Finally, Reports is where you go to get your class results.  You can get the whole class' results in an Excel sheet or individual reports in .pdf or even individual question results in .pdf.  There's a choice of having the results emailed, downloaded or saved to your Google Drive.

The other tab is the Dashboard.  From here you have 4 choices:  Start a Quiz, Quick Question, Space Race or Exit Ticket.  Start a quiz and Space Race use quizzes you've previously created or added.  Quick Question can be done on the fly.  You can choose from Multiple Choice, True/False or Short Answer.  The Exit Ticket consists of 3 pre-set questions that assess understanding, asks what was learned, and a Teacher Question that you can give verbally or on your board - that's also short answer.  The perfect Exit Ticket!

When you choose "Start A Quiz", you first select the quiz you want to use from the ones you've created.  You also choose how to deliver the quiz.   You can let it be student paced, where they get immediate feedback (in order, no skipping, no changing answers), or student paced where they control the navigation (any order, they can skip questions).  You can also deliver it as Teacher paced, where you can send one question at a time, in any order, you can skip questions and also revisit questions.  

The Space Race uses the quiz of your choice and object of your choice.  Some choices include a rocket, unicorn or a bear.  As students answer the questions correctly, their object "races" across the screen.  They LOVE this game!!!  And I love that I can download the report and see how well they've mastered the content!


The third tab is for "Live Results".  From here you can watch the students' progress in real time.


This app is very user friendly and incredibly easy to navigate.  The students really enjoy the Space Race - it gets them engaged and focused on the content.  The "Start A Quiz" feature is wonderful for independent work if you have computers in your room, or want to assign an online quiz for homework.

Tuesday, October 20, 2015

Evernote


 Anyone who knows me knows I am fanatical about Evernote.  I figure it's about time I share my love with you! 


Evernote is a lifesaver! It has helped me become organized, both at work and with my family.  And I think I've barely scratched the surface as far as what it's capable of!  I seriously don't know what I'd do with out it.  It helps me keep information at my finger tips, organize projects, birthday parties, vacations, and I never worry about losing anything!


Evernote is a free note-taking, organizing and archiving productivity app.  It has unlimited storage (with a limit of 60mb upload/month).  It is extremely user-friendly.  It's open-ended.  You determine how to set it up and use it!  Here's the basics:  You create notes.  The notes are organized into Notebooks.  Notebooks can be organized into Stacks.  You can also create tags for your notes to help expedite searches.  You label your notes, notebooks and stacks any way you want!  

For example, I have a Stack labeled Number Systems.  I have Notebooks within the stack labeled Approximating Square Roots, and Repeating Decimals to Fractions, etc.  And within the notebooks, I have the handouts and ideas I've come across for each of these topics.  Can you see how easy it makes planning?  If I come across something I don't plan on teaching until the spring, I can still save it in Evernote, and when I need it - I'll actually be able to find it!  There a so many ways to use this app - especially for teachers!  


Notes can be created within the app.  OR, you can email them to yourself using your personal Evernote email - found in

settings.  OR you can use Web Clipper - a browser extension - that lets you bookmark and save full pages that you can also annotate!  It lets you save emails, .pdfs, and even audio files!  You can take and save pictures within the notes!  


Another app that works seamlessly with Evernote is Penultimate.  It has virtual journals that are automatically synced in Evernote.  This is where I take notes at meetings.  I have a separate journal for Team Meetings, Math Meetings, PLCs, PDs, and Staff Meetings.  I even created journals to store my kids' artwork! 


You can also share notebooks!  You can do this with colleagues, parents or students.  Here's one of my favorite ways of using Evernote with Edline:  I created a notebook called "Absent" in Evernote.  Every day I create a new note and title it with the date.  In the note I take pictures of my board (objectives, hw, warm up, etc) and any handouts we used.  I have shared this notebook with my Edline page.  Parents and students can go on to Edline, open up this notebook and see what they've missed!  They can even print out the handout if they need it.  This is GREAT for students who are out sick for extended time!


I also use a LiveScribe pen (more on that in the future!)  It allows me to take notes that sync with an audio file.  This lets you see AND hear the notes.  Also great for students who miss class.  And guess what?!  I share this with my Evernote account which is also shared with Edline.  Students can hear the notes they missed, in my voice, and print out the notes.  This is a favorite with parents, as you can imagine!


My kids use Evernote to save Science Fair and History Day information, along with other projects.  They've been using it for years - as young as 3rd grade!  I  keep a pic of my teacher ID in here - so when I'm shopping I can get my discount without worrying about taking my ID with me!  This would work with library cards and other store cards, too.

Sign up for your free account at Evernote.  Like I said, it's very user-friendly.  There are also a TON of videos on YouTube, and more information all over Pinterest.  This is easily one of the most versatile and accommodating apps I've ever come across. If you're already using Evernote, I'd love to hear how you use it!


Tuesday, October 13, 2015

Explain Everything

 Explain Everything is an interactive screencasting whiteboard app that is available on Android and iOS.  It can be used in classrooms by teachers and students  to convey material either being learned or for assessment.  I use it to reteach material covered in class.  It gives students an opportunity to hear the lesson again if they didn't get it the first time.  It's incredibly useful for students who were absent, so they don't miss out on critical information.  Even more useful for students who are out for extended periods.  It can also be used for summative assessments.  Having students "teach" or present projects on this platform is very revealing as far as the level of their understanding.  We only have a handful of iPads in our building, but I can have groups take turns recording, while the other students prepare and practice their presentations.  This would be perfect for a station activity.


There are many features in this app!  You can choose the color palette for starters.  You can also write by hand with a stylus or type in a text box.  You can use shapes or import pictures.  You can use a variety of laser pointers to help viewers focus, and of course there's audio!  When you record your presentation, it records everything you do on the screen and the audio, too! 


The best feature of this app is that it uploads to a wide variety of platforms.  Some of these include Dropbox, Google Drive, YouTube, Vimeo, Twitter, and Facebook.  I created a YouTube Channel for my students and parents where I can directly upload my videos. It does take a while to upload - the longer the video, the longer the upload takes.  If you can upload through a MAC computer, it goes faster.  (I'm still saving!)

Using Explain Everything makes for a unique alternative to summative assessments.  Students can showcase what they've learned, and it's "safe" because it only uses their voices - their identity remains private.  It's very user friendly, and easy to learn to navigate.  Best of all, it's FUN! 

CCBOE Teachers:
Technology Tip of the Week
·         Need Office for your home PC, laptop or Mac?  Login to https://portal.office.com/home with your CCBOE email address and password.  Staff and students are able to install on up to five (5) personal devices.
OneNote is a great tool to collect information.  It is an electronic organizer/notebook. You can create sections and easily add multiple types of documents (Word, Excel, and PowerPoint).


Tuesday, October 6, 2015

Kahoot!


Have you heard of Kahoot?!  It's fantastic!  It combines learning with your students' love of games and devices.  And it's FREE!  Teachers love it because you can print out a spreadsheet of student data.  It's web based, so you can use it with laptops, too.  It's a fun and effective way to assess your students' learning.

How to Kahoot:
Go to getkahoot.com to sign up for free.  Once you're signed up, you have a choice of creating a quiz, a discussion or a survey.  But WAIT!  At the top you'll see "Public Kahoots".   If you click here you can search through pre-made quizzes by searching by your topic. There are some great things ready to use - what a time saver!  Creating your own quiz/
discussion/survey is really easy, too, if you can't find something "perfect" that fits your needs. 

Quiz
This is for collecting data on your class. This is just like giving a multiple choice quiz on paper, but it is WAY more fun because of its game-like format. The teacher enters questions and answer choices, and then you're all set to "Launch".  You can add images and video to your questions, too.   The data is collected as you go so you can easily identify students who have mastered the skill and which students need more support..

Discussion
This option is meant to spark a discussion with your class with just one question.  I honestly haven't used it - I don't think it fits as well in a math class.  Either that or I haven't figured out how to use it in a way that benefits my class.I'd love to hear from you if you've figured out a successful way to use this!

Survey
The survey is very much like a quiz, but there are no scores.  I suppose this would be a great option for classes whose competitive nature causes problems.


It's really this easy to use!

Creating a Quiz:
1.  Select Quiz
2.  Enter a (unique) title.
3.  Enter the question and the amount of time you want students to have and then enter your answer choices.  Make sure you indicate the correct answer with the green button.  
4.  When you're done adding questions, click "Next".
5.  Add a cover image.  *You can also choose music to play while students are signing up.  Really sets the mood!

And that's IT!  Your Quiz will be stored under "My Kahoots" tab on top.  When you click here, you will see a list of your creations.  There is an option next to the title that says "Share".  This is where you can enter your colleagues' user name and it will populate in their account!  I shared one with Mrs. B. a couple of weeks ago and it worked seamlessly!

Game Time! 
1.  You log in to Kahoot, on your projector/computer.  Find the Kahoot you want to use under "My Kahoots" tab on top.  Click "Play".
2.  Students log in to www.kahoot.it
3.  When you're ready to begin, click LAUNCH on the Quiz you want to use.
4.  The game-pin will be displayed.  Students log in using this code and sign in with their name (or their class #!  Their name will show when they're successfully signed in.
5.   Click "Start Now" when your students have all joined.  (It will show the # of students).
6.  There will be a wait time before the question and answer choices are displayed.  (Answer choices are only displayed on the projector, not on their devices.  Weird, right?)
7.  The timer will countdown on the screen depending on how much time you assigned the problem.
8.  When time is up, or when all students have answered, you will see the results.  You can also review the image here if you'd like.  Then you can click "next" to see the Leader board. 

*  Students are given immediate feedback if they are right or wrong AND they're given their ranking in the class by points earned!  This is really motivating and exciting for the students and what makes it so fun! 

Gathering Data:
At the conclusion of the game, you can select "Save Results".  You have the option of saving it to Google Drive, or downloading a spreadsheet.  It will break down the results by student and by question.  It's impressively thorough!

I really hope you'll try this app.  It does require access to devices, but you can easily put students into teams if you have limited devices to share.  I promise you, it's worth it.  The kids really do enjoy playing and it's incredibly valuable in terms of gathering data!  Definitely a Win-Win!

Tuesday, September 29, 2015

Class Dojo


Class Dojo has been around for several years, but I've been hearing teachers at my school talking about it lately.  I thought this would be a great time to formally introduce it here on Tech Tuesday.

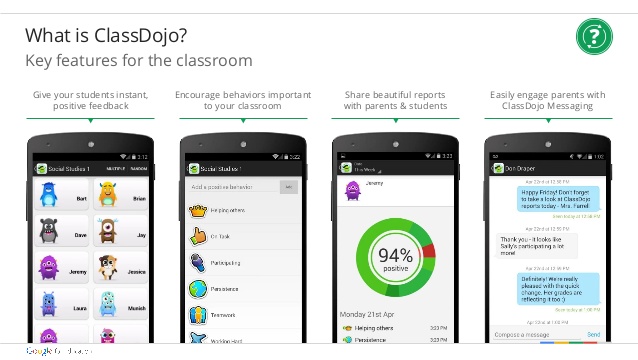
Class Dojo is an online classroom management system.  There's an app for that - for iOS as well as Android - but it's also web based, so you can use your computer if you don't have a device.  This makes it relevant to EVERYONE.  And, it's FREE!  It does seem kind of elementary, as the avatars are little monsters and very cartoonish, but it is still very well received by older students


Its biggest asset is that it directly involves the parents/families.  They are given a code (either by invitation or they can sign up themselves with the .pdf printable) to gain access.  Parents can review their child's points (feedback) in real time - there's a time stamp so parents can see exactly when their darling is behaving, or misbehaving!  You can also use Class Dojo like a blog and share pictures and class updates on their feature called "Class Story".  Finally, they can read/reply to Instant Messages from the teacher!


The behaviors are fully customizable.  You can align it with your class rules or your school's rules, or whatever behaviors you want to reinforce (or diminish).  You can include positive behaviors like Cooperation or Participation, etc. and negative behaviors such as Talking During Instruction or No Homework, etc. 
 
 It's important to make the points they earn relevant.  At our school we use "Bulldog Bucks" - I plan on letting them cash in their points for Bucks.  At the elementary school level, I'd have a reward system in place where they can use their points to buy rewards like Lunch with the Teacher or even tangibles like erasers or stickers or fancy pencils, etc.  It's really entirely up to you, but if you want student buy-in, it's important to make it relevant. (FYI - if you google "Class Dojo Printables" you will find a LOT of resources!  Check out Teachers Pay Teachers as well.)

Class Dojo lets you print out reports per student or by class, by behavior or skill.  You use it to track attendance, too.  It has a random feature so you can call on students... well, randomly!  Teachers can even broadcast messages to all connected parents through the instant messaging feature.  You can share students with other teachers so they can also contribute to their points.  I personally think this would be a great way to track data for our special education population.  Another great feature is their 24/7 support!


How do you sign up?  It's SO easy:
Go  to www.classdojo.com and sign up with their step by step directions.
You can add students to your class by copy/pasting from Word or Excel - or one at a time.
Customize the behaviors or skills you want to track.
Once you're set up, print out the parent invitations and distribute them, or invite parents via email.
When you're ready for class, just bring up Class Dojo on your device, desktop computer or Smartboard (projector) and start tracking behavior by awarding or deducting points.  Since you can do this on your device, you can give or take away points away from the classroom, such as in the hallway or cafeteria, or even on field trips!  

Parents can opt for notifications so they know when their child is being praised or losing points for misbehavior in REAL TIME.  Think about that - how powerful!!!


Monday, September 21, 2015

Plickers


Formative assessments are the key to differentiating  and being able to target students' needs.  Sometimes these formative assessments can take time to evaluate, and sometimes you can't get to them until after class.  

Plickers eliminate that time factor!  They can be used in class for INSTANT feedback!  Best of all, they're FREE!  Yes, you read that right - FREE!!!  Another huge advantage for Plickers is that the teacher is the only one who needs a device - so this is perfect for classes without access to technology, or schools that are not BYOD.  :)  And compared with traditional clickers, there's no set up time and no batteries to fuss with.  And did I mention they're FREE?!

Students are given a "Plicker" which looks like a giant QR Code.  They are numbered - you set up your class so each child is associated with a number.  Each side of the card as a letter, a-d.  You can write your questions ahead of time or do them on the spot.  You can ask multiple choice questions or true/false.   Your students won't be able to "cheat" by looking at other cards because they all look different and the letters are pretty small.  This makes your results reliable, and also forces each student to participate!


You can download and print the plicker cards from www.plickers.com - 40 of them!  You can laminate them or print them on cardstock.  I have a class set that I have laminated, but I'm going to print another set for each student to glue into their Interactive Student Notebooks to save even more time.

When you're ready to ask your questions, you control it with a Smartphone.  It projects onto the board through www.plickers.com in the "Live View".  Students hold up their card with their letter choice on top.  You scan the room with your Smartphone and as each card is read (instantly), their name is checked off on the screen.  When you've scanned all the students, you switch to the graph view, and voila - you have a bar graph showing you how many students chose each answer!  You also get the class percentage, and on your phone, you can see which students answered correctly and which did not.  


It's really impressive how quickly the phone picks up their answers, and the distance at which it can read them!  Students just need to be reminded that they have to hold the cards upright, without covering any of the black part and to hold them still.  I used these the other day to go over our warm up and I was able to quickly discern which students needed to work on the concept in a small group, and which students were ready to move on.

The only draw back (for now) is that you can't print out a report with specific results per student.  You can only get class results.  They say they're working on this though.

To use Plickers:
1.  Sign up at www.plickers.com with your name, email and password.
2.  Set up your classes under the "Classes" tab & enter student names.
3.  Write your questions in your "Library", and sort by folder.
4.  Download the app "Plickers" on your device.
5.  When your class is ready, open up the app, and select the class and select "Live View" on your screen.
6.  Select the question you want to ask.
7.  Click "Scan" (it has a camera icon).
8.  Scan the room!  You will see their names being checked off on the screen.  I tell them to put their cards down after they've been scanned.  On your phone you will see their name either in green (correct) or red (wrong).
9.  On the screen, select graph.  You can discuss the problem, and then select "Reveal Answer" and it will show them the correct answer.
10.  Now go back to students and move on to the next question on your Smartphone.  It will automatically change it on the screen!
11.  On their website, you can view the results from the "Reports" tab.  They also have a very extensive "Help" menu from that tab.

I hope you'll give these a try.  Kids love the instant feedback, and the instant results are invaluable as an educator.  Plus, they're fun!! 

Sunday, September 13, 2015

Quizlet

Quizlet is a FREE, web-based app that provides learning tools for students.  It has virtual flashcards that they can use to engage in 6 different learning activities. These include Flashcards, Study mode, Speller (w/audio), Test (you can reset it to get unique tests each time!), Scatter game and Space Race game.  You can even choose different languages!  I really like the Flashcard mode because it lets students "Star" the ones they want to review again - and when they go back to study, they can focus on the ones they need to review.  The games are great, too, because kids are having so much fun, they don't even realize they're studying!

There's an optional paid version for $24.99/month that allows you to track student progress, add images to your sets, add your voice to the audio and lets you create unlimited classes!

The FREE version lets you create up to 8 classes, add your own flashcards and you can still use sets created by others.  It also links to Google Classroom!  The best part of all is how user-friendly it is!  

Here's how to start using Quizlet:
Go to www.quizlet.com.
Click on Sign Up - you can also sign up with Google.
Fill in the information requested (birthday, user name, email, password, and if you're a teacher).  Then agree to their terms and conditions and then Sign Up.

To set up your class, select "+ Create A Class" from the left side of your screen.  
Name your class, and provide a description (optional).
Add your school name.

Add a Pre-Made Study Set:
Use the search feature and enter your topic.
Scroll through the study sets that have already been created until you find one that meets your needs and click on it.
Under tools on the top right, select "Add to Folder".  This will prompt you to create and name a  folder.  I recommend creating folders according to topics you cover.  For example, I have a folder for exponents, and one for systems of equations, etc.  This makes it easier for students to find what they need.
Add the set you selected to this folder.

Creating your own Study Set:
From your class page, select "Add A Set"
The last choice is "Create a New Set"
You can choose to create a new set by hand, OR you can import!  You can copy/paste from Word, Excel, Google Docs, etc.  How fast and convenient!
Last, click on Create and you're done!

Inviting your students is easy!  
Students go to www.quizlet.com.  It is best if they create their own free account so they can save their progress.  They can use the search function for your Quizlet name.  Or from your class page, you can click on "Add Members" at the top right.  Here you can choose to enter student emails, or send a bulk email or get a join link (that can be made into a QR code or embedded into a blog!), or link to Google Classroom.

How will Quizlet benefit my students?
Quizlet helps students study exactly what they need to know for your class.  They can do it in a way that's fun and engaging.  I use it in my classroom to help students review material that I already expect them to know, such as integer operations and fraction operations - and even basic facts.  Students who struggle at this level are often too embarrassed to admit they need this kind of help - but by providing the practice for them on Quizlet, they can get the review they need, at their own pace, and in the privacy of their own home.  I can use Quizlet with new material by projecting it onto my Smart Board.  I can make a station out of the Space Race or Scatter games during rotation lessons.  There are so many ways to use Quizlet successfully to help your students master the material for your class!

You can check out my Quizlet by joining my class: The hAPPy Math Teacher

Monday, September 7, 2015

Smart Seat

Smart Seat is a paid app for iOS ($4.99) for your iPhone or iPad.  It is one of my main classroom management tools, so I thought it worthy of sharing, especially at this time of the year.

Smart Seat is primarily a seating chart app.  You can set up the layout of your room so it reflects the number and placement of your students and desks.  But it does so much more!   You can take attendance - and track it in a spreadsheet.  You can take pictures of the students so it will show on the app.  You can use the "Random" feature to randomly call on students.  (They LOVE this!)  You can keep notes on the students - running records, behavior infractions, reminders for calling home, etc. and export to email!  And the seating chart itself can be printed or exported as a PDF to email or Dropbox. 

The seating chart is very easy to use, with a drag and drop method.  You can customize it to show pictures or not, first name, last name, even nicknames!  This is so helpful in learning their names and faces.  And invaluable when you have to leave a seating chart for a substitute!

My favorite feature is you can use this to create learning groups at random.  Just select how many groups you need, and click on "Create".  And if you don't like the grouping, you can keep clicking on create and it will continue to make new groups.  Voila!  

Very user friendly and in my opinion indispensable!!! It can be found in the App Store or click here for more information:  Smart Seat.  If you already have the app, check out these FAQ!

Be hAPPy!

Tuesday, September 1, 2015

QR Codes

QR Codes are everywhere these days - you can find them on cereal boxes, magazines, and now in your classroom!  A QR Code is a 2D barcode that contains data that can be read by a phone's camera. Most smartphones come equipped with software that allows them to download a QR Code reader. Once you download a reader, the phone's camera acts like a scanner, allowing it to "read" the barcode.  There are several apps for QR readers that are free for both iOS and Androids.
QR Codes are easy to create.  There are many websites that do this, for free!  The one I is use is qrme.com.  All you do is enter the information you want the QR code to reveal, and click "Create"!  That's it!  You can then use the code that's created in a Word document or on a business card or poster, etc.

You can use QR codes for text (as in a written message), url codes (website links), contact information, YouTube videos, text messages, and even maps!

In my classroom, I've used QR codes in so many ways.  I've used them during station activities where the code contains the answer to the problem so students can self-check.  I've used them at open house with the link for "Remind" and my contact information. When you scan the code, the information is added directly to the phone's contacts.  I've used it on homework handouts with links to videos that give support on the topic.  I've also used them to provide parents with a link to a google doc to give me contact information and my blog address on the course syllabus.

What other ways can you envision using QR codes with your class?  Please share your ideas! 


Thursday, August 27, 2015

Tech Tuesdays: REMIND

I am so excited for another school year!  It may not come as a surprise to you, but I am VERY passionate about using technology in the classroom, and sharing my experiences with other teachers.  I will be blogging each week (on Tuesdays after this) about a different app or technology that I use in my classroom in the hopes that you will be inspired to use it, too!


The beginning of the year is the perfect time to introduce REMIND.  I've used this for years and have found it to be a very powerful tool in supporting both students and parents!


So what is REMIND?  Remind is a free, safe, easy-to-use communication tool that helps teachers connect instantly with students and parents.  Teachers can sign up in seconds. Use Remind to send quick Announcements to the entire class.  Phone numbers are always kept private so information is safe and secure. Teachers, students, and parents have easy access to their message history.  Save time by sending or scheduling Announcements directly to students’ and parents’ phones. Get instant feedback from your class with Stamps.  Any teacher, student and parent can start using Remind today, for FREE, on any device. No commitments or classroom changes required.


Here's how to start:
1.  Click here: Remind
2.  Click on Teacher sign up
3.  You can sign in with Google, or enter your email, click "Continue Sign Up"
4.  Enter your name and create your password and click "Complete Sign Up"
5.  Create your first class by giving it a Name and clicking "Create Class"
6.  The next screen gives you information to share with parents/students so they can sign up.  You also have the option of a .pdf file to print and share, or send invites through email, or for the link.  I recommend making a QR code and sharing through your syllabus, at open house, on your business card, or through your other communications.
7.  From your Class, you can click on settings and change the class code.
8.  Add more classes by clicking on "+" next to "My Classes".  You can have up to 20!
9.  You can also select "Join A Class" if you want to follow someone else's reminders.


* When parents or students sign up, they are given the option to receive your reminders via text or email.

SENDING your reminders:
1.  Log in
2.  Type your message in the box (you can select more than 1 of your classes to receive your message)
3.  Click "Send".


This is such a great, user-friendly tool, and I know parents really appreciate it as well.  It keeps them informed and helps them support their children at home.  I love that this is one-direction communication, so the parents don't have access to my personal phone number.  I use it to send out homework daily (it really takes a few seconds!), test reminders, field trip reminders, and anything else I need them to know. 


I hope you'll try using Remind this year.  Please leave a comment if you try it out and let me know what you think!
Click here to begin:  Remind

Be hAPPy!
Debbie